How to Add a Printer on a Mac
If you need to add a printer on a Mac and nothing happens when you press print, or your Mac simply isn’t showing the printer at all, this guide walks you through the fix in a few straightforward steps.
Before you start
- Make sure the printer is switched on and either plugged into your Mac with a USB cable, or connected to the same Wi-Fi network as your Mac.
- If you are on an office network, confirm your Mac is on the same network as the printer — not a guest network.
- You will need an administrator account (admin rights) to add a printer. If you are not sure whether you have them, check with whoever manages your IT before you begin.
Steps to add a printer on a Mac
- Click the Apple logo in the top-left corner of your screen.
- Click System Settings (macOS Ventura or later) or System Preferences (earlier versions of macOS).
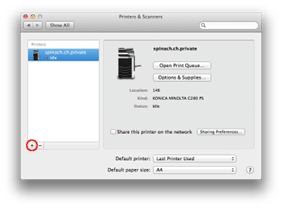
- Click Printers & Scanners in the sidebar. You will see a list of any printers already added to your Mac.
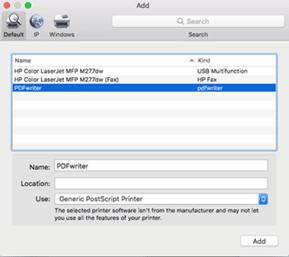
- Click the Add Printer, Scanner or Fax button — it looks like a plus sign ( + ) beneath the printer list. A new window opens showing every printer your Mac can currently find.
- Click the name of your printer in the list. If it does not appear, skip to the troubleshooting section below.
- Wait while macOS downloads and installs the correct driver — the software that lets your Mac communicate with the printer. If a prompt appears asking you to install something, follow the on-screen instructions and let it finish.
- Click Add once it appears at the bottom of the window.
- Your printer will now appear in the Printers & Scanners list.
- Open any document, press Command + P, select your newly added printer from the dropdown, and click Print to confirm everything is working.
If that didn’t work
The printer doesn’t appear in the list
Check that the printer is on and connected. For Wi-Fi printers, try turning the printer off and on again, then wait 30 seconds and reopen the Add Printer window. If your Mac and printer are on different network segments at the office, the printer may not be visible — speak to your IT team.
macOS says it cannot find a driver
Visit Apple Support and search for your printer make and model. Apple lists compatible printers and notes where you need to download software directly from the manufacturer.
The printer appears but jobs are stuck in the queue
Open Printers & Scanners, click your printer, then click Open Print Queue. Delete any stuck jobs, then try printing again. If jobs keep getting stuck, restarting both the printer and your Mac often clears it.
You are trying to add a printer on a Mac in a shared office
Shared or networked printers are sometimes added using an IP address rather than appearing automatically. In the Add Printer window, click the IP tab, enter the printer’s IP address, and select the correct protocol (usually IPP — Internet Printing Protocol). Ask your IT team if you do not know the printer’s IP address.
If you also need to add a printer on a Windows machine, our guide on how to add a printer on Windows covers that separately.
When to ask us
If the printer worked yesterday and has stopped for everyone in the office at once, that points to a network or server issue rather than a Mac setting — that needs a technician. Computer Care customers can raise a support ticket and we will take it from there.
Need help with other Mac settings? Our guide on how to add a shared mailbox to Outlook on a Mac is worth a look if you are setting up a new machine.
Screenshots